RussOgi.com
  • Home
  • Blog
  • 3D Printed Art
  • Other Works
  • In The Media
  • Shows

Letting The Cat Out of The Bag Part 1

5/30/2017

2 Comments


Do The Cat and I have History?

Picture

Insurance companies aren't usually the first places that come to mind when I hear 3D Printing and Computer Graphics. But it is now, at least when I think of Island Insurance and their spokes...cat.

The project involved the development of a physical prop of the Island Insurance mascot, the Island Cat. The Island Cat was part of a series of light-hearted commercials that utilized an interesting combination of 3D printing and cutting edge computer generated animation to bring the Island Cat to life on the small screen.

In fact, parts of the same 3D computer model were used to create both the physical 3D print of the Cat and do the computer animation.

I get asked all the time about the projects I've worked on. Unfortunately, I'm often not allowed to talk about a lot of my client work since they're usually part of a project that hasn't gone public yet. That was the case when I first worked on the Island Cat prop.

But now, the Cat's out of the bag. I received special permission from Island Insurance to talk about how the Island Cat went from 2D concept illustration to the star of it's TV commercials.  The links below go to a couple of the original commercials.  And if you'd like to know more about Island Insurance you can visit them online here.

Click here for the "Fishing Buddy" commercial

Click here for the "Big Hitter" commercial
Picture
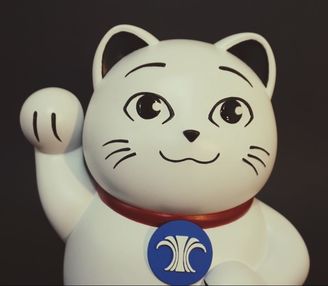
Several months back, I was contacted by Island Insurance to create a second shooting prop of their mascot, the Island Cat. The Island Cat is based on the Japanese Maneki Neko (beckoning cat).

Although there are many variations, the Maneki Neko is generally regarded as a symbol of good fortune or prosperity.

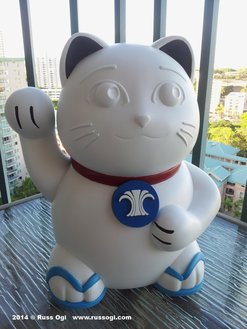
The Island Cat, is a Maneki Neko with a Hawaiian flair to it. Most notably, he wears rubbah slippahs (AKA flip flops to those of you outside of Hawaii). Also, instead of a traditional bell or medal, he has a medallion with the Island Insurance logo on it. He is, after all, a brand representative.

This was actually a return to the project for me. I worked on the original prop for Island Insurance a couple of years back. The first prop, was created specifically for a series of commercials where the Cat's face and paw would be animated via CG (computer graphics).

Originally, I was contacted by a buddy of mine, writer/director, Ryan Kawamoto from Kinetic Productions, to work on the project. He wanted a physical prop of the Cat to shoot with.

Why not just create the entire cat in CG? Well, to create a realistic looking CG prop is difficult and time consuming. It takes a good deal of effort to get the highlights and shadows to match real world lighting conditions. The result can be close, but the human brain can perceive the difference.

Also, for the actors, it is usually easier to act with a character that is actually there, on set with them, rather than pretending the character exists.

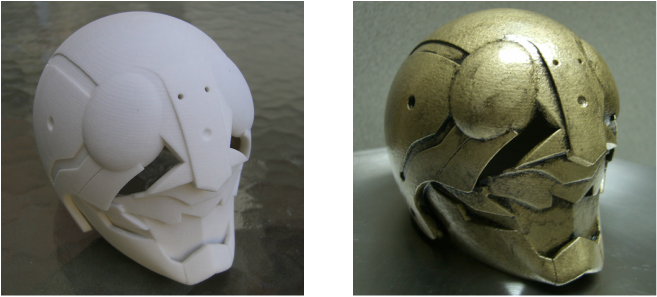
So, having the Cat as a real prop with only the animated face and paw added in made life easier for production. And that's when Ryan pulled me into the mix. The deadline and budget were extremely tight. Almost to the point where I turned down the project.  But, with the help of 3D printing, I was able to fabricate the Cat on budget and in time for its first shoot.

Picture
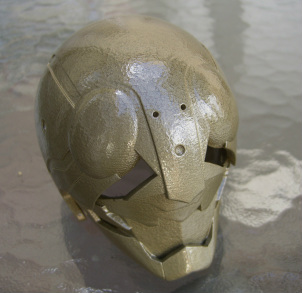
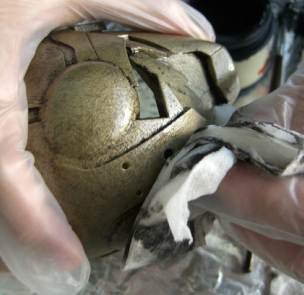
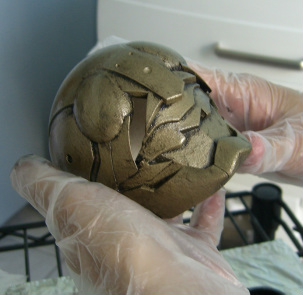
The finished prop had raised 3D facial features but they were not painted in. We decided the raised features would aid the CG animation team with placement of the digitally animated face.

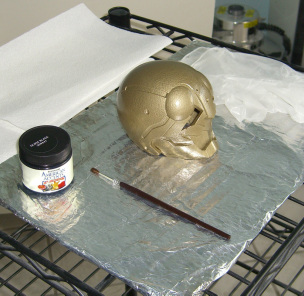
Fast forward a couple of years, Island Insurance decided they wanted a version that had the face painted in. However, as with most characters, and people, their faces change over time. The Cat's face had evolved a bit from the original concept illustration, so Island Insurance wanted an update to his facial expression.

And that's my history with the Island Cat.  I'll be following up in a week or so with Part 2, creating the virtual sculpture that would eventually be 3D printed.  Part 3 is also now available where I talk about the work that goes into turning a 3D print into a finished prop.

Have you ever worked on a project like this or have any thoughts about the Island Cat? Please leave a comment below.

2 Comments

What About The Raijin and Fujin Kabuto?

6/15/2016

0 Comments

 
Picture
I've been meaning to consolidate the links to the i.materialise blogs that I did for the Kabuto Design Challenge all in one place.  Finally got around to it.  Both English and 日本語. 

Blog 1
Developing the concept...
Blog 2
Building the model...
Blog 3
Making the model watertight.


ブログ1日本人
3Dプリントが日本のサムライ文化に出会う―「風神雷神兜」デザインコンセプトが生まれるまで

ブログ2日本人
Autodesk Maya で兜を3Dモデリングしてみよう

ブログ3日本人
これだけは知っておこう!Autodesk Mayaを使った3Dプリント前の下準備

0 Comments

How Do You Get to the Ideal Sculpture?

9/26/2015

0 Comments

 
Picture
In a film appreciation class, I was once taught that, in the ideal movie, visually, every frame would be composed and lit perfectly.  You could stop on any frame in a movie, and it would be a visual work of art in, and of, itself. 

Well composed, well lit, with a fore, middle and background.  This single frame would tell its own story and carry it's own visual interest.  A picture suitable for framing and displayed as photographic fine art.

That is all in theory.  In the real world, I'm not sure it's possible.

I apply this concept to my virtual sculptures.  I adapted my sense of composition and light from photography to my virtual sculpting and began to take more time to pan the camera around my model and view each angle as a snapshot of the piece.  

My goal was to eliminate angles with weak profiles.  Usually, a sculpture has a "signature" angle - the view that it looks the best from and is usually viewed from. 

In past projects, I have been aware of how my sculpts look from the major angles - front, back, left and right.  But the "Freedom of Flight" was the first time I spun the model to see how the lines continually flowed as the viewer moves around the piece.

The "Freedom of Flight" sculpture is a collaboration with artist Eileen Borgeson and holographer Jeff Allen.   An article about our project can be found here.

When it came time to fine tune the sculpture, in Maya, I rotated the sculpture a few degrees and followed the lines of the figure and the strand that encircled it. 

It was a mater of rounding out the strand at certain points or bringing it closer to the figure in some areas and moving it away in others.  Sometimes it was even changing the angle of a section looking to see how they all played together as one silhouette paying special attention to the wings making sure they read as wings or created dynamic lines.

To see something is to observe how light and shadow describe its surface.  Initially, I applied a middle grey blinn shader and watched the way the light (usually a key and fill light) played off the surfaces.  I noted how the highlight morphed and flowed as I rotated the sculpt. 

I made many subtle adjustments.  Adjustments, that, unless you compared the before and after models side by side, you might have a difficult time picking out the differences.  You would only know that the "after" model looked or felt better.

While I've done similar evaluations with other sculptures before, this was the first time that I had been so meticulous, stopping every few degrees to note it's composition.

Please share any of your thoughts or tips on digital sculpting in the comments section.


0 Comments

Fujin and Raijin At the Maker Fair Tokyo 2015

8/5/2015

3 Comments

 
Picture
Fujin and Raijin Kabuto 3D printed in bronze at the i.materialise booth at the Maker Faire Tokyo 2015. Essay describing the helmets provided by Yui Takahara of i.materialise.
The bronze miniatures of the Fujin (god of wind) and Raijin (god of lightning and thunder) kabuto (helmets) were on display at the Tokyo Maker Faire.  Big thank you to Yui Takahara and her amazing team at i.materialise.
Picture
Fujin Kabuto natural bronze with Polyurethane (PU) coating (left), Fujin Kabuto with patina (middle) and Raijin Kabuto natural bronze with PU coating (right). Pictures by Yui Takahara
The patina on the center kabuto came out more subtle than I would have liked.  I really wanted a greater contrast between the raised areas and recesses to really pull out the details. 

As a result, the contrast between the PU coated bronze and the patina are not as striking in pictures.  You can read about the patina process I used in here in English or here in Japanese.  Japanese translation provided by Yui Takahara.

I took a series of shots to get a pictures that captured the effects of the patina for the blog post.

Please let me know what you think of the designs, the patina or the patina process in the comments below.
3 Comments

新しければいいってもんじゃない?風神兜をアンティーク加工してみた

7/30/2015

1 Comment

 
前回の記事に引き続き、こちらも日本語翻訳版です。僕の日本語はあまりうまくないのですが、日本の読者の方にも記事を読んでいただけるよう、i.materialiseのユイに記事を翻訳してもらいました。

風神雷神兜をデザインする前は、 金属素材で加工したことがあるのは鋼、亜鉛めっき鋼、鋳造したアルミとブロンズ一作品だけでした。

最近の作品はどれも3Dプリントで作っているので、年季の入った感じを表現するときには金属風のアンティーク加工や金属製の箔をつけるしかありません。僕の作品はデザインと同じくらいその加工技術も評価してもらっているので、今回はブロンズのミニチュア兜の加工にぜひトライしてみたいと思っていました。

いつもプロジェクトの相談にのってくれるi.materialiseのユイと話して、今回はブロンズ兜のひとつに緑青付けをして東京メイカーフェアで展示することに決定しました。作品をわざと古めかしく見せられる緑青を、加工技術として使った経験はありません。以前ブロンズで製作した作品は、時間が経つにつれて自然に濃い茶色に変色していきました。

今回の兜はイベントの関係上数週間で仕上げなければならなかったので、自然に緑青や錆びが付くまで待つことはできません。人工的に緑青風の加工をするのは、僕にとって未経験のテリトリーでした。

僕が住んでいるハワイはそのユニークな自然環境のため、化学製品の物流や使用が厳しく制限されています。毒性のある化学製品を扱えるスペースも用意できないので、今回は手に入る身近なものでブロンズの古色化に挑戦することにしました。

思い通りの質感を実現するため、何通りかのやり方を試してあります。今回紹介するのとは別の加工方法に興味のある方は、次回以降のブログで詳しく紹介します。

こちらが加工前の風神兜。
Picture
i.materialiseから届いたばかりの兜は、強い輝きのある真新しいものでした。表面にはPU(ポリウレタン)の透明コートがかかっていて、これが傷や錆びを防止する働きをします。

アンティーク加工を施すにはこのPUコートをはがす必要がありました。やり方はアセトン液に漬けるだけ。マイケルミューラー氏が以前i.materialiseのブログに寄せた記事でもアンティーク加工の方法が詳しく紹介されているので参考になりますよ。

まずは安全第一。僕は作品を加工する際にはいつも実験用保護メガネやマスクを付けます。
Picture
用意するもの:アセトン、グラスコンテナ、清潔なタオル、ニトリル素材のゴム手袋

アセトンはアメリカの一般的なホームセンターなら比較的簡単に手に入ります。ガラス容器の中にたっぷりとアセトン液を入れたら、ゴム手袋をした手で完全に兜を沈ませます。タオルはアセトンがこぼれてしまったとき用。アセトンを使って作業するときは、野外か換気の良い場所で行いましょう。
Picture
こちらがアセトンの中に沈んだ風神兜。45分ほどこの向きで、上下さかさまにしてもう45分アセトンに漬けた。

合計90分アセトンの中に兜を漬けたら、取り出して乾かす作業。ニトリル素材のゴム手袋をしておくことでアセトンが手についたり手の油脂が作品についてしまったりするのを避けられます。指紋が少しついてしまうだけでも緑青が均一にならないことがあるので注意。

その後は何通りか加工の方法を試しました。卵、食器洗い機用洗剤、重曹、油、アンモニア溶液、塩やお酢など様々なもの使っての試行錯誤です。

最後にたどり着いたのは重曹。溶解しなくなるまで重曹をお湯に溶かした液の中に、5日ほど風神兜を沈めておきました。 

Picture
重曹溶液の中に入った風神兜。化学反応のため溶液には青い色がついている。

結果はすごく濃い緑青になった訳ではないけど、明るい茶色に変色しています。古めかしい雰囲気になってはいるものの、金属独特の輝きも保った質感に仕上げることができました。

Picture

明暗をはっきりさせてコントラストを強調するため、ネットつきのスポンジと歯磨き粉、スクラブ入り床洗剤を使って凸部分を擦ります。あまり目立つ効果はないものの、ディテールを浮き上がらせることができました。

最後のステップはコーティング。室内で飾る展示用作品なので、ワックスではなくスプレークリアコートを選びました。クリアコートをかけると深みのある色に仕上がります。

Picture
Picture
完成品
1 Comment

想像力あふれる兜デザインとは?

7/29/2015

0 Comments

 
Picture
僕の日本語はあまりうまくないのですが、日本の読者の方にも記事を読んでいただけるよう、i.materialiseのユイに記事を翻訳してもらいました。

僕は以前i.materialiseとモデラボが共同開催した「兜デザインコンテスト」を盛り上げるため、風神と雷神をモチーフにしたオリジナルの兜をデザインしました。さらにコンテスト終了後には審査員の一人として優秀作品を選ばせてもらいました。

全てのエントリー作品はこちらからご覧いただけます。

優秀作品に選ばれた兜はこちらでも紹介しています。

エントリーされた作品は素晴らしいデザインばかり。優秀作品をi.materialiseを通じてブロンズで3Dプリントしたものが下の写真です。写真は全てi.materialiseの提供。


Picture
最優秀賞:TSURU-KAME Kabuto by かわたんさん

鶴と亀をモチーフにした前立てが唐草模様でアレンジを加えた伝統的な形状と合わさり、素敵なコントラストを生み出している兜。滑らかな線の流れが3Dアートの要素と混じっている前立ては特に印象的でした。


Picture
2nd Place: Ika Kabuto by Nao

準優秀作品:烏賊兜 by Naoさん

この「烏賊兜」は大胆なモチーフとディテールの作りをうまくまとめた作品。有機的な要素と無機的な要素が組み合わさることで、バイオメカニカルな雰囲気を醸し出しています。イカの触手を前立てと眉庇(まびさし)に見立てたイマジネーションはすごい。


Picture
準優秀作品:ウサギの兜 by Naoさん

ウサギの兜は特に興味をそそるスマートな作品でした。一見うさぎと人参にしか見えないのですが、よく見ると実は吹き返し、錣(しころ)、眉庇が人参の葉で表現されていることに気付きます。兜として見るとウサギは確かに前立てとしても機能しています。一見ひとつのものにしか見えないのによく見ると他の要素が浮かび上がるこうしたデザインは、個人的にとても好きなものです。

優秀賞に選ばれた皆さん、おめでとうございます!コンテストに参加いただいた皆様もありがとうございました。

8月1日、2日開催の東京メイカーフェアに足を運ぶ予定の方は、i.materialiseブースで展示される僕の風神雷神兜をチェックするのをお忘れなく。デザインコンテスト優秀賞の作品もモデラボのブースにて展示します。写真でも十分デザインの良さが伝わってくる兜ですが、百聞は一見にしかず。ぜひ直接ご覧ください。

兜デザインへのコメントは、下のコメント欄へどうぞ。

0 Comments

Should Everything Look New? Aging Fujin

7/27/2015

1 Comment

 
Before the Fujin and Raijin Kabuto project, my experience with metal fabrication was limited to steel, galvanized steel, cast aluminum and only one other cast bronze piece.  

My recent pieces are 3D printed so any aging or metallic finishes have to be artificially done through antiquing or metal leafing.  Much of my recent work is known as much for the finishing I apply to the 3D prints as their design.  So, I was eager to try my hand at applying an aging effect to the bronze miniature kabuto from the 3D design challenge.

For the upcoming Tokyo Maker Faire, I discussed with Yui, my go to person at i.materialise, about applying a patina to one of the kabuto.  I had never worked with patinas before.  The one bronze piece I did create, obtained its dark brown patina naturally over a few years.

The kabuto needed to be ready in a few weeks so I didn't have the time to let it naturally acquire a patina.  I would need to artificially create the patina. 
I was headed into uncharted territory.

Because of Hawaii's unique geography, we have tight regulations about the shipping, disposal and use of chemicals.  I also don't have a workspace conducive to working with toxic chemicals, so, I chose to explore methods of creating a patina on bronze using more common items.

I tried several methods to varying degrees of success.  For those who may be interested in trying any of the other methods, I will detail my journey in a following post.

For this post, here is the Fujin kabuto before the patina.

Fujin Original
When the Kabuto arrived from i.materialise it had a brilliant shine to it.  It was also coated with a Polyurethane (PU) clear coat to prevent oxidation. 

The first step to applying a patina was to remove the PU coating.  A simple dip in acetone did the trick. There is a great tutorial by Michael Mueller on the i.materialise blog that outlines the basic process.

Safety first. I always wear safety glasses and/or a respirator with an organic vapor filter.
Supplies
Supplies: acetone, glass container, clean towel, nitirile gloves
Acetone is generally easy to obtain from US hardware stores.  I filled the glass container with enough acetone to completely submerge the kabuto.

Using the nitrile gloves I place the bronze piece into the acetone.  The towel is mostly for accidental spills.  When working with acetone work outside or in a well ventilated area.
Acetone bath
Here is Fujin submerged in acetone. I left him in for about 45min right side up, then flipped him upside down for another 45min.
I removed the piece from the acetone and let it air dry.  The gloves keep my hands protected from the acetone and prevent getting body oil on the piece.  Any fingerprints may cause an uneven patina.

I then went through several experiments before getting the final patina.  I experimented with eggs,
dishwashing detergent, baking soda, oil and a solution of ammonia, salt and vinegar.

Ultimately, I used baking soda for the patina seen at the end of this post.

I mixed a solution of water saturated with baking soda.  To do this, I continually add baking soda to hot water until the baking soda stops dissolving.

I filled a glass container with the solution and let Fujin sit for about 5 days. 
Baking soda solution
Fujin submerged in the baking soda solution. The blue color developed in the liquid from the chemical reaction.
Not an instant or really dark patina but I managed to get a light brown color.  What was nice about this patina was that it had an aged look but still had a metallic sheen to it.
Fujin aged
To give some contrast, on the final piece, I used a netted dish sponge and I experimented with toothpaste and Soft Scrub to buff out the raised areas.

It is a subtle effect but it brings out the details.

The final step was to seal the surface.  Since it was intended as an inside display piece, I opted for a spray clear coat rather than wax.

The clear coat also gave the patina a deeper color.
Final Fujin piece front
Final Fujin piece back view
Finished
1 Comment

Looking For Inspired Designs?

7/24/2015

3 Comments

 
Fujin with fade
A little while back I had the honor of designing a couple of kabuto (Samurai helmets) to kick off the i.materialise and Modelab Kabuto Design Challenge.  I also had the honor of serving as a judge.

You can view all the entries here.

The winners were announced here (announcement in Japanese only)

There were some truly amazing designs.  Here is a run down of the winners with pictures of them printed in bronze by i.materialise.  All pictures are courtesy of i.materialise.


Crane and Turtle
1st Place: Tsuru Kame Kabuto by Kawatan
The Tsuru (crane) Kame (turtle) kabuto puts an interesting spin on the "classic" kabuto profile by utilizing a lacy pattern to create the kabuto form resulting in a nice contrast of visuals.  The maedate (front crest) contains an elegant blend of line art elements flowing into 3D sculpted forms.

ika kabuto
2nd Place: Ika Kabuto by Nao
The Ika (squid) Kabuto has a great sculpt with a nice balance of broad and fine details with clean lines.  It has a great combination of organic and inorganic forms giving it a bio-mechanical feel.  Very imaginative to utilize the tentacles to form the maedate (front crest) and mabizashi (visor). 

Usagi
3rd Place: Usagi Kabuto by Nao
The Usagi (rabbit) helmet was especially intriguing and clever.  At first glance, what I saw was the carrot with a rabbit.  However, the more I examined it, I began to see the fukigaeshi (side protective wings), shikoro (neck guard) and mabizashi (visor) formed from the carrot leaves.

In the context of a kabuto, the rabbit is then perfectly placed as the maedate (front crest).  I really enjoy designs that present themselves as one thing but more is revealed as you examine the design.


おめでとうございます Congratulations to the winners!  どうもありがとうございました Thank you to all who entered.

If you are in, or visiting Japan on August 1-2.  The winning helmets as well as my Fujin and Raijin kabuto will be on display at the i.materialise booth at the Tokyo Maker Faire.  As great as pictures are, nothing beats seeing these kabuto in person.

Please leave any thoughts you have about any of the designs in the comments below.
3 Comments

What Happens When You Mix 3D Printing and Samurai Helmets?

6/27/2015

5 Comments

 
Picture
If you've seen my gallery, then you know what I think happens when you mix modern technology and Japanese Samurai helmets also known as kabuto.

Well, the recent Kabuto Design Challenge sponsored by Modelab and i.materialise Japan asked Japanese designers to create what they thought.  Check out the entries here.

There are some pretty amazing entries, and I had the honor of being one of the judges to select the best of the best. 

I was really amazed at the creativity.  Some were dramatic in their design while others were deeply symbolic.  For some, the explanations really brought the concepts to life.

If you can't read Japanese, try Google Translate.  Good enough most of the time.  If you don't want to read, just look at the pictures.

I can't say too much about the entries since the winners haven't been announced yet.  Look for the results coming up next month.

I'd like to know what you think.  Please post your thoughts on the entries in the comments section.  And, if you've ever designed or re-imagined armor - Japanese, European, Spanish etc. I would love to see and hear about your designs.
5 Comments

Too New?  Make It Old.

6/24/2015

0 Comments

 
What do you do when you have a 3D print and you don't want it too look like it's fresh out of the printer?  If it's non metallic you can use a process called antiquing.  I've used variations of this process on many of my 3D printed pieces.  If done properly, it can add a lot of character to your model and highlight details.

In this posting, I'll go through the basic method of antiquing using easy to acquire materials.  We'll start with your bare print and end up with the antiqued piece.

Kamen Rider before and after
The image on the left is the bare print made from what's commonly referred to as the sandstone material. The image on the right is what we'll end up with.

Supplies needed:

Latex or nitrile gloves or similar
Scouring pad (optional)
Paint brush or sponge brush
Damp paper towels
Covered work surface
Gold base coat (or other colors)
Black or grey water based paint (must be water based)
Clear coat (optional)

Base coat
Same model after the gold hammerd metal base coat.


1) Spray 3D print with base coat color ensuring an even, consistent coat of paint. Allow time for adequate drying often 24 hrs for full cure. Follow recommended safety instructions and dry time as per the manufacturer's product label.

2) (optional) If your model has a lot of flat open areas you can use the scouring pad to distress the surface.  The antiquing paint get caught in the fine scratches left by the scouring pad and give the flat areas texture.  You can be creative and also use this technique for weathering effects. 

3) Prepare a covered work surface and have several sheets of damp paper towels. Half sheets work well. The number of sheets will vary according to size of project and level of detail. Use latex gloves to keep your hands clean. This process can get messy. It largely depends on the complexity of the project.

supplies
Foil covered work area and supplies.


4) Mix antiquing paint well. Follow manufacturer's label for mixing and safety instructions.  For this blog post, I'll be using black paint.  However, depending on the look you're going for, the paint could be different shades of black, grey, brown or green especially if you're trying to mimic a patina on a metallic surface. 

American Accents black paint
Bottled Rust-oleum black paint.


5) Begin brushing or sponging on the antiquing (black paint) coat in roughly one inch square areas. It may be possible to work larger areas again, depending on surface area, detail etc. Immediately wipe off the excess paint leaving the antiquing coat in the corners and recesses of the model. The main goal is not to cover too much area at one time. If the excess paint dries, it becomes permanent.

brush on black paint
Black paint brushed on a small flat area. If applied to to large of an area at one time, the paint may begin to dry.
wiping off excess black paint
Wipe off the excess paint with a damp paper towel. As you can see the majority of the black paint is removed leaving black in only the crevices.
reapplying black paint
Some shallow or deep recesses may require re-application of the antiquing paint to get proper coverage.
remove excess paint
Removal of the excess paint with a damp paper towel.


6) Allow the remaining antique coat to dry. Apply a clear coat as an optional step.

finished piece
Model after the antiquing is finished.
If you have any tips for antiquing please feel free to share them in the comments section or if you have tried the technique, I would love to see your results and the sort of projects you're working on.
0 Comments
<<Previous
Forward>>
    Picture

    RSS Feed

    Author

    Based in Las Vegas but originally from Hawaii, Russ Ogi is a mixed media artist.  His background and passion are in photography and traditional sculpture.

    Raised in a crossroad of cultures, he grew up with Eastern and Western influences. His art reflects that unique fusion of aesthetics and traditions.

    Sculpting in Autodesk Maya, Russ 3D prints his digital model in a variety of media from plaster and plastics to metal.

    From here, his prints often undergo meticulous handcrafting. He often utilizes custom finishing techniques to further instill a feel or emotion into a piece.  

    With almost 20 years of experience in the high-tech industry, and his background in Additive Manufacturing, Russ has also served as a consultant for numerous financial, safety and product development organizations internationally. 

    Among some of his notable clients are the Hawaii State Department of Education, the Joint POW/MIA Accounting Command (JPAC currently DPAA) and the New York Office of the Chief Medical Examiner.

    He has been a sponsored or featured artist with companies such as Autodesk, imaterialise, 3D Fuel  and, LulzBot.

    Archives

    April 2021
    March 2021
    March 2019
    February 2019
    January 2019
    November 2018
    June 2018
    March 2018
    January 2018
    October 2017
    August 2017
    July 2017
    June 2017
    May 2017
    June 2016
    May 2016
    December 2015
    November 2015
    October 2015
    September 2015
    August 2015
    July 2015
    June 2015
    May 2015
    April 2015

    Categories

    All
    3d Printing
    Armor
    Art
    Blockchain
    Cinema
    Educational
    Exhibitions
    Half Scale Samruai Armor Build
    Half-scale Samruai Armor Build
    Personal
    Samurai
    Technology

    RSS Feed

Copyright Russ Ogi 2024

Web Hosting by iPage